I recently set out to do something that seemed complicated: take the camera movement from one video and apply it to a completely different one without touching the original content. Turns out there’s a specific tool for this in ComfyUI called IC-LoRA Cameraman v2, designed exactly to transfer only how the camera moves (pan, push, angle, tracking) from a reference video onto a new AI-generated video. I spent two days really testing it, generated three different videos, ran into a system RAM bug that nearly threw the whole thing off the rails, and here’s what I learned about this camera control technique in LTX video.
With LTX 2.3’s evolution, camera movement transfer has taken a real step forward. This article documents a real test of the IC-LoRA Cameraman v2 workflow, including setup, settings, and troubleshooting encountered during generation.
At a Glance: IC-LoRA Cameraman v2 in ComfyUI
| Aspect | Details |
|---|---|
| Main function | Camera movement transfer (not content) |
| Base model | LTX Video 2.3 |
| VRAM requirements | 24GB minimum |
| System RAM requirements | Watch free RAM, not just VRAM (see real bug below) |
| Minimum recommended resolution (author) | 960x512 |
| Resolution used in the test | 960x1084, 24fps, ~5s |
| Official workflow | Free on HuggingFace (Cseti) |
| Needs Boogu Edit | Only for complex multi-element scenes |
What IC-LoRA Cameraman v2 Is and How It Works
IC-LoRA Cameraman v2 is a LoRA (low-rank adapter) created by Cseti, available on HuggingFace under the Cseti/LTX2.3-22B_IC-LoRA-Cameraman_v2 repository. The checkpoint I used is the step 14000 one. The idea is simple in theory but effective in practice: it works with LTX Video 2.3 through an in-context conditioning system that lets it transfer camera movement patterns without touching the visual content.
What sets this approach apart from classic ControlNet or traditional motion-transfer is that IC-LoRA doesn’t need a separate control architecture. It works directly inside the LTX 2.3 model as a very specific fine-tune: it teaches the model to recognize and reproduce camera movements when given a reference video, without that affecting the content of the generated scene. In other words, IC-LoRA Cameraman in ComfyUI completely isolates the movement pattern from the visual content.
👉 The key point: IC-LoRA Cameraman v2 is a specialized LoRA that transfers only camera movement within LTX 2.3, without altering the content of the starting image or requiring external control architectures.
Important Clarification: The Full Pipeline vs. the Real Test
There’s a YouTube video from the Benji’s AI Playground channel titled “LTX 2.3 New Camera Control Using IC-LoRA + Krea 2 + Boogu Edit Mix Models” that describes a much more elaborate pipeline for complex scenes. That flow includes:
- Generating elements separately with Krea 2 (character, background, etc.)
- Compositing them with Boogu Image 0.1 Edit
- A second Krea 2 pass to recover texture
- Finally, LTX 2.3 + IC-LoRA for the camera transfer
That video’s workflow is exclusive to Patreon subscribers, so I couldn’t reproduce it as-is. In my real test, I used the official, free workflow that Cseti themselves publishes on HuggingFace (Cseti/ComfyUI-Workflows, path ltx/2.3/ic-lora-cameraman-v2/), and I didn’t include Boogu Image 0.1 Edit at any point.
Why? Because the test scene was a single shot that didn’t need element compositing. The starting frame was generated in a single, direct text-to-image step with Krea 2 Turbo. Here’s the truth: Boogu Edit is useful for complex scenes where you need to separate and recompose elements, but IC-LoRA works just as well with simply-generated images, because all it does is transfer camera movement, regardless of how the starting frame was generated.
👉 What matters: You don’t need the full Krea 2 + Boogu Edit pipeline to use IC-LoRA Cameraman. Cseti’s official workflow is enough for single shots or simple images; Boogu Edit is only necessary if you need to compose multiple elements.
The Workflow: Real Configuration and Necessary Adaptations
Cseti’s official workflow (workflow.json) is image-to-video: a reference image defines the starting frame, and a reference video feeds the IC-LoRA guidance. It also works in text-to-video mode if you leave the starting image empty.
I adapted it as workflow_adapted.json with these changes:
- UNETLoader → UnetLoaderGGUF: changed the node to point to
ltx-2.3-22b-dev-Q6_K.ggufinstead of downloading the full 22GB fp8_scaled - Optimization nodes bypassed: disabled
LTX2MemoryEfficientSageAttentionPatchandPathchSageAttentionKJbecause thesageattentionlibrary wasn’t installed. They’re only for speed, they don’t affect quality or camera control results
The new models I had to download were:
| Model | Source | Local Path |
|---|---|---|
| IC-LoRA Cameraman v2 | Cseti/LTX2.3-22B_IC-LoRA-Cameraman_v2 | models/loras/ltx-2.3/ic-lora-cameraman-v2_14000.safetensors |
| LoRA distilled speed | Kijai/LTX2.3_comfy | models/loras/ltx-2.3/distilled-1.1_lora-dynamic_rank111_bf16.safetensors |
| Text encoder (Gemma) | Comfy-Org/ltx-2 | models/text_encoders/ltx-2.3/gemma_3_12B_it_fp8_scaled.safetensors |
I also installed three new custom nodes: comfyui-int-and-float, ComfyUI_Fill-Nodes, and RES4LYF. The workflow also depends on ComfyUI-LTXVideo, ComfyUI-KJNodes, ComfyUI-VideoHelperSuite, and rgthree-comfy, which I already had from previous tests.
💡 Tip: If you don’t want to download the full ~22GB fp8_scaled transformer, check whether a quantized GGUF variant already exists (like the Q6_K I used here) before committing to the large download. Bypassing the SageAttention nodes is equally valid if that library isn’t installed in your environment: you only lose some speed, not quality.
The Three Real Attempts: From Synthetic to Working
First Attempt: Synthetic Reference Video
I started with a reference video generated with ffmpeg zoompan: a simple lateral pan over an image of a vintage red convertible in a desert canyon at sunset (generated with Krea 2 Turbo). The prompt for the final video was completely different: a café scene with a croissant on a table by a window.
Result: the camera movement transfer technique worked. The camera movement transferred coherently and visibly. The content was totally different between reference and result, exactly as expected. But since the reference video was synthetic, it wasn’t a realistic use case.
First attempt: top, the synthetic pan over the convertible car (reference); bottom, the result over the generated café scene, completely different content but the same camera movement.
Second Attempt: Real Reference Video, Subtle Movement
I moved on to a real video I recorded myself: a subtle pan-and-tilt movement over a microphone and a pen holder on a desk. The transfer worked technically, but the result (resultado_camara_real.mp4) ended up not being very showy as a demo because the reference movement was too subtle. This taught me an important lesson: a discreet camera movement gives a technically correct but not very demonstrable result.
Second attempt: the movement does transfer (judge for yourself, top vs bottom), but it’s subtle enough that it barely reads as a demo — the reason a third video with a more pronounced movement was recorded.
Third Attempt: Real and Pronounced Camera Movement (the One That Works)
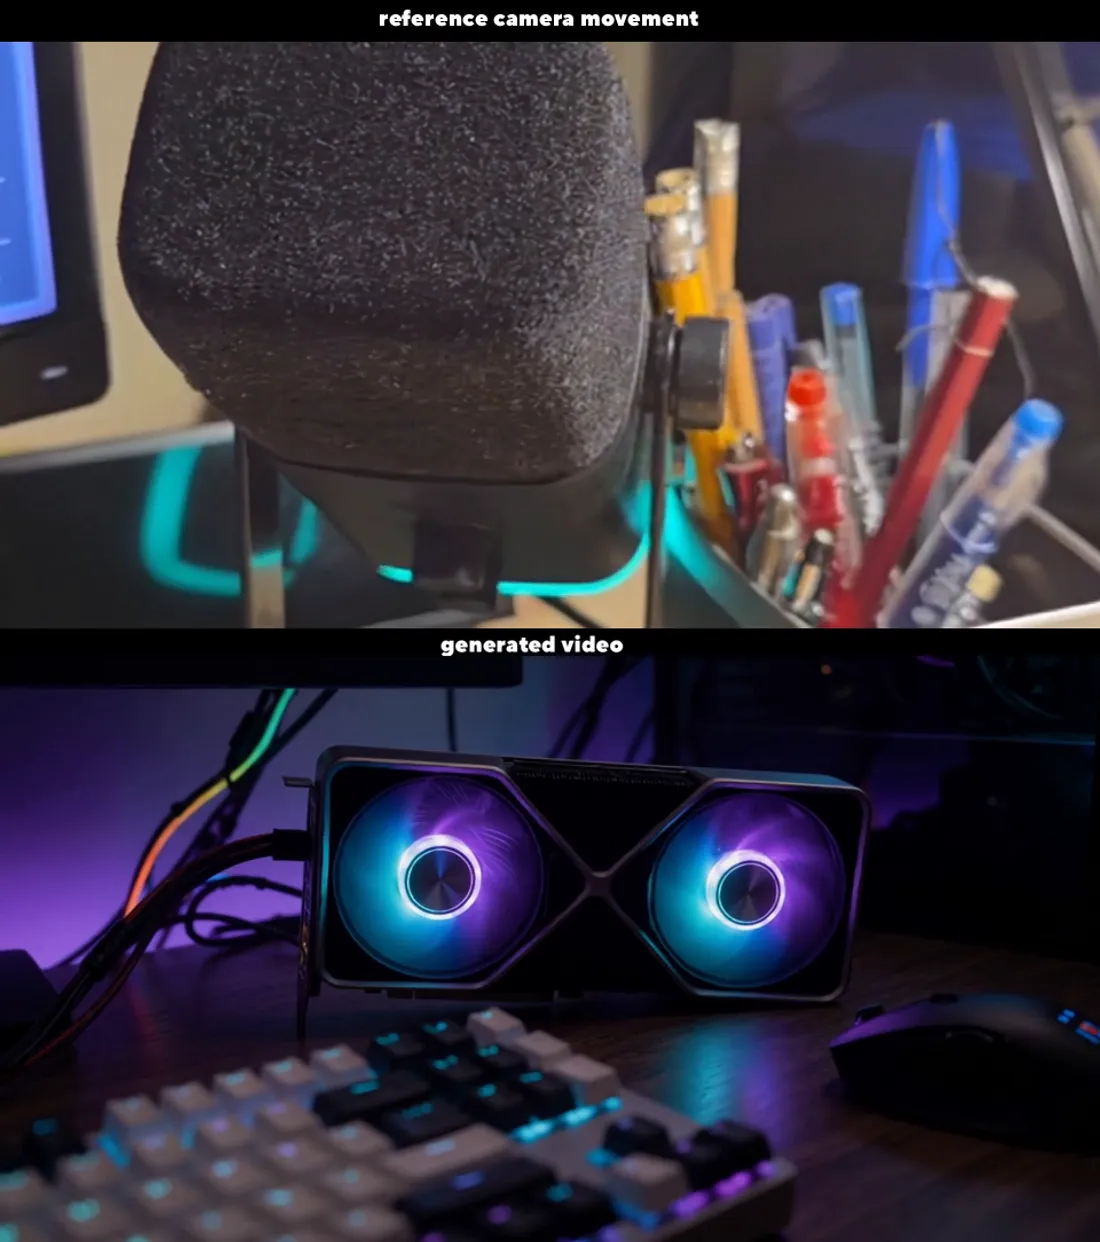
I recorded a second real reference video with a much more deliberate movement: a camera push (dolly-in) combined with a pan, going from a wide shot to a close-up, over the same microphone and pens.
For this test I generated a new starting image with a prompt designed on purpose:
“An RTX GPU with ARGB fans in purple and cyan tones, on a desk at night, blurred mechanical keyboard in the foreground, visible RGB cables”
It was generated with Krea 2 Turbo (8 steps, cfg 1, euler sampler, simple scheduler, denoise 1, seed 987654321), in a single text-to-image step with no editing or later compositing. The prompt was deliberate to give good shot separation and fit ComfyLab’s theme.
Result: resultado_camara_real_v2.mp4, the video that really works. The camera movement (push + pan) transfers clearly and coherently. I compared frames one by one and the tracking of the reference movement is evident.
Real demo video from the third attempt: camera push + pan transferred onto the RTX GPU night-desk scene. Resolution 960x1084, 24 fps, ~5.04 seconds.
👉 What I learned: Camera movement transfer works best with deliberate, visible movements. Subtle movements are technically correct but less demonstrable visually.
Key Settings from the Original Author: What to Change for Better Results
Cseti’s official workflow README includes specific recommendations. I used these values as-is and they worked for me — I didn’t test varying them one by one (a single resolution, a single image strength value), so what follows is what the author recommends and what I applied, not an independent point-by-point verification:
Resolution: per the author, the higher the resolution, the more closely the reference movement is followed. Don’t go below 960x512 on the first pass. My final video was 960x1084, and the result followed the movement clearly — but I didn’t test lower resolutions for comparison, so I can’t confirm the relationship with my own data.
Conditioning image strength: use values between 0.5 and 0.7. This parameter balances fidelity to the starting frame against how much of the reference camera is transferred. Lower values (within that range) = more movement relative to the starting image, per the author’s own notes — less fidelity to the starting frame leaves more room for the reference movement to take over.
The text prompt matters: it directly affects the resulting camera movement. If the video doesn’t follow the expected reference movement, the author recommends: leaving the prompt empty, changing the seed, or describing the camera movement at least at a general level in the prompt.
⚠️ Important: The official workflow only exposes this single “image strength” parameter to balance fidelity to the starting frame against transferred movement — there’s no separate “amount of movement” control. If the result doesn’t follow the reference camera well, the first lever to touch is this value, don’t look for a parameter that doesn’t exist in the graph.
The Real Bug: System RAM OOM, Not VRAM
During testing of this workflow, ComfyUI crashed completely with no traceback right when decoding the final video+audio VAE. The system was using approximately 27GB of 31GB of total RAM. The GPU had plenty of VRAM headroom, so that wasn’t the problem.
Cause: system RAM exhausted while decoding video and audio simultaneously.
Fix: I closed a browser with a lot of open tabs. That freed up enough RAM for the full generation to finish without issues. It took 12 minutes in total.
Practical lesson: in LTX 2.3 + IC-LoRA workflows that decode video and audio together, watching system RAM is just as important as watching VRAM. A process can crash from RAM even with plenty of GPU headroom to spare.
Workflow Download and Final Video Specifications
🏗️ Workflow: IC-LoRA Cameraman v2 + LTX 2.3
Final video technical specifications (verified with ffprobe):
| Parameter | Value |
|---|---|
| Codec | h264 |
| Resolution | 960x1084 |
| Frame rate | 24 fps |
| Duration | ~5.04 seconds |
| Audio | No audio track |
Minimum requirements to run this: a GPU with 24GB of VRAM, ample free system RAM (the real OOM bug happened with ~27GB of 31GB already in use, so the more free RAM before launching the final decode, the better), and ComfyUI with the custom nodes mentioned above installed.
Frequently Asked Questions
What exactly does IC-LoRA Cameraman v2 do in ComfyUI?
It transfers only the camera movement (pan, push, angle, tracking) from a reference video onto a newly generated video with completely different content. It doesn’t copy the reference video’s content, only how the camera moves. This was confirmed across the three real tests, where reference content and results were completely different from each other.
Do I need Boogu Image 0.1 Edit or Krea 2 to use this workflow?
Not necessarily. The YouTube video that inspired the technique describes a more elaborate pipeline (Krea 2 + Boogu Image 0.1 Edit + Krea 2 again) for composing scenes with several separate elements, but in a real test with a single shot that composition step wasn’t needed: it’s enough to generate the starting frame in a single text-to-image step and apply IC-LoRA Cameraman on top of it. The LoRA only handles the camera, not how the frame was generated.
Where do I get the IC-LoRA Cameraman v2 workflow if the one from the YouTube video is paywalled?
The LoRA’s own author (Cseti) publishes an official, free workflow on HuggingFace, in the Cseti/ComfyUI-Workflows dataset, path ltx/2.3/ic-lora-cameraman-v2/. You don’t need to rebuild the graph from a Patreon video — that official workflow is what was used for the tests in this article.
Why does ComfyUI crash with no error when decoding the final video in LTX 2.3 workflows?
It can be a system RAM OOM, not GPU VRAM. It happened right when decoding the final video+audio VAE, with the system at around 27GB of 31GB of RAM used, with no traceback at all. Closing applications that use a lot of RAM (in this case, a browser with too many tabs) freed up enough memory to finish the generation without issues.
What resolution and image strength does the IC-LoRA Cameraman v2 author recommend?
According to the author’s own notes, don’t go below 960x512 on the first pass: the higher the resolution, the more faithfully the reference camera movement is followed. For the conditioning’s image strength, they recommend a value between 0.5 and 0.7 if you want more transferred movement. If the result doesn’t follow the reference movement, they suggest trying an empty prompt, changing the seed, or describing the camera movement at a high level in the prompt itself.
Conclusion: A Technique That Really Works
After three real attempts, it’s clear IC-LoRA Cameraman v2 works consistently. Camera movement transfers regardless of content, whether the reference video is synthetic or real, whether the movement is subtle or pronounced. The main lesson is that a deliberate, visible reference movement gives better demonstrative results.
The author’s free, official workflow is a perfectly viable alternative to trying to rebuild paywalled YouTube workflows. And the system RAM bug is a real reminder that these combined video+audio workflows can exhaust RAM before VRAM.
🏆 Our Recommendation
If you’re looking for camera movement transfer in ComfyUI without dealing with paywalled pipelines → use Cseti’s official workflow available on HuggingFace. If you need to compose multiple elements (character + background) → then go ahead and integrate Boogu Image 0.1 Edit into the pipeline. Leave plenty of free RAM on the system before launching the final decode, not just VRAM on the GPU, and use reference videos with deliberate movement for better visual results.
Keep Reading
If you want to generate your own starting frames with Krea 2 Turbo like I did in this test, check out our Krea 2 in ComfyUI guide. If you’re interested in the LTX 2.3 family and its real workflows on an RTX 3090, we also have the LTXV-2.3 + RTX Super Resolution walkthrough. Prefer a parametric camera path (orbit, push, pan by exact angle) over transferring movement from a reference video? We also tested Uni3C ControlNet for Wan 2.1, a different, native-ComfyUI approach to camera control. And if the system RAM bug sounds like something that’s already happened to you, it’s not a coincidence: we documented the same bottleneck (RAM, not VRAM) much more exhaustively, with 4 crashes reproduced and confirmed by the kernel’s OOM killer, in this other article about the LTXV-2.3 dev model on RTX 3090. LTX 2.3 is also one of five models in our real local AI video comparison on one RTX 3090, tested alongside SCAIL-2, Wan 2.1, and Wan 2.2.
Next steps in ComfyUI
Getting started
More video and image AI workflows
- Wan 2.2 in ComfyUI: image-to-video Dual-model MoE architecture, VRAM requirements and real output.
- HunyuanVideo 1.5 in ComfyUI Real install of the I2V 480p step-distilled variant on an RTX 3090.
- 5 local AI video models tested on one RTX 3090 LTXV-2.3, SCAIL-2, Wan 2.1 and Wan 2.2, all benchmarked on the same hardware.
FAQ
- What exactly does IC-LoRA Cameraman v2 do in ComfyUI?
- It transfers only the camera movement (pan, push, angle, tracking) from a reference video onto a newly generated video with completely different content. It doesn't copy the reference video's content, only how the camera moves -- confirmed across three real tests with reference content and results that were completely different from each other.
- Do I need Boogu Image 0.1 Edit or Krea 2 to use this workflow?
- Not necessarily. The YouTube video that inspired the technique describes a more elaborate pipeline (Krea 2 + Boogu Image 0.1 Edit + Krea 2 again) for composing scenes with several separate elements, but in a real test with a single shot that composition step wasn't needed: it's enough to generate the starting frame in a single text-to-image step and apply IC-LoRA Cameraman on top of it. The LoRA only handles the camera, not how the frame was generated.
- Where do I get the IC-LoRA Cameraman v2 workflow if the one from the YouTube video is paywalled?
- The LoRA's own author (Cseti) publishes an official, free workflow on HuggingFace, in the Cseti/ComfyUI-Workflows dataset, path ltx/2.3/ic-lora-cameraman-v2/. You don't need to rebuild the graph from a Patreon video -- that official workflow is what was used for the tests in this article.
- Why does ComfyUI crash with no error when decoding the final video in LTX 2.3 workflows?
- It can be a system RAM OOM, not GPU VRAM -- it happened right when decoding the final video+audio VAE, with the system at around 27GB of 31GB of RAM used, with no traceback at all. Closing applications that use a lot of RAM (in this case, a browser with too many tabs) freed up enough memory to finish the generation without issues.
- What resolution and image strength does the IC-LoRA Cameraman v2 author recommend?
- According to the author's own notes, don't go below 960x512 on the first pass -- the higher the resolution, the more faithfully the reference camera movement is followed. For the conditioning's image strength, they recommend a value between 0.5 and 0.7 if you want more transferred movement. If the result doesn't follow the reference movement, they suggest trying an empty prompt, changing the seed, or describing the camera movement at a high level in the prompt itself.